Jump to content

Welcome to 4GTuner
Register now to gain access to all of our features. Once registered and logged in, you will be able to create topics, post replies to existing threads, give reputation to your fellow members, get your own private messenger, post status updates, manage your profile and so much more. If you already have an account, login here - otherwise create an account for free today!
Photo

Evo 1-3 Dash Removal ( lots of pics )

- - - - - Dash removal Evo 1-3

  • Please log in to reply
15 replies to this topic

#1
dsm2evo

dsm2evo

    Advanced Member

  • Active Members
  • PipPipPip
  • 157 posts
  • Locationcanada

Hey guys figured I would try to contribute a little something. When I first acquired my Evo there was one big problem with it and that was the heater core needed to be replaced. Now while the heater core it self is not a big problem nor is it expensive taking out the dash for most people is a pretty big pain. So I decided to help walk you guys through it! 


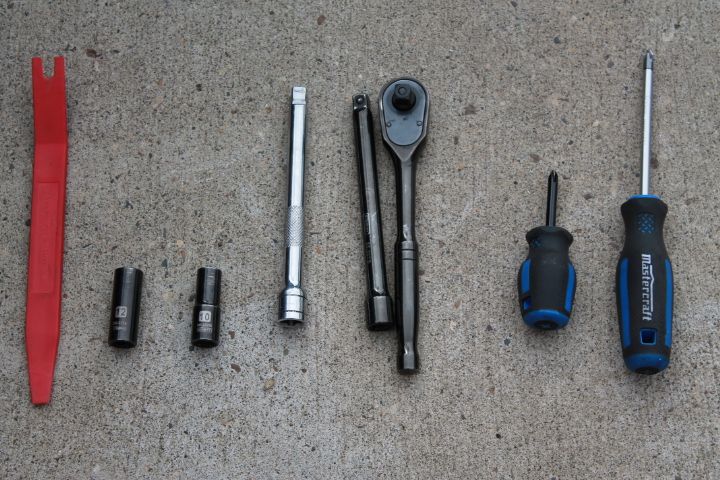
First off here are the tools you will need:


long Phillips head screw driver

Stubby Phillips head screw driver

3/8 Ratchet

10mm socket

12mm socket

Two 6" extensions

and a Trim removal tool ( you can substitute for a flat head but after using one of these bad boys you will never do that again )


IMG_5033_zpsxjtb5fsq.jpg


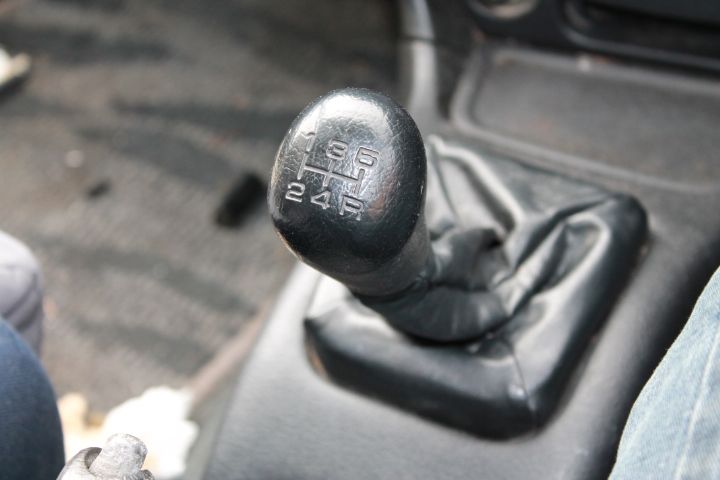
Now first we will take off the shifter, just run to the left and she should unscrew.


IMG_5032_zpskceb0gd5.jpg


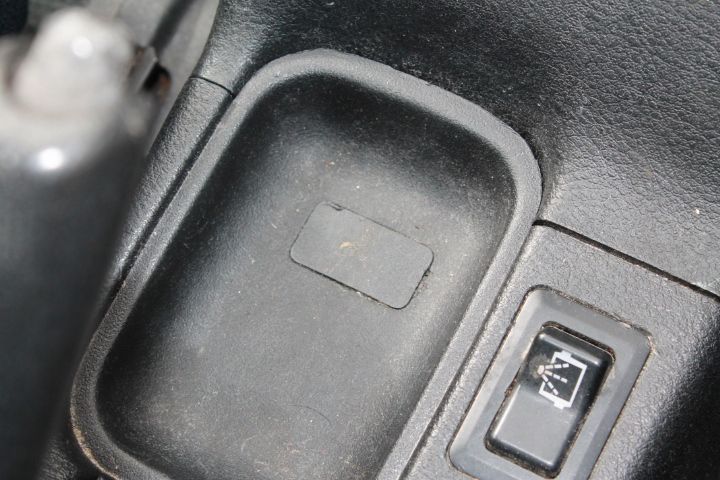
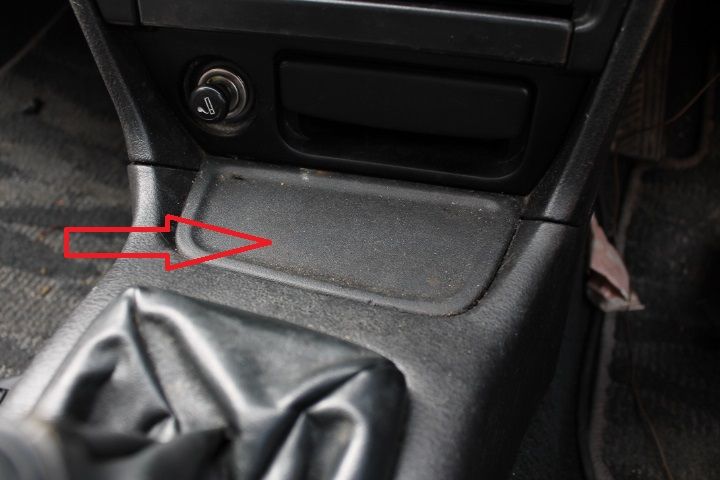
Now take we are going to remove a hidden screw under a cap, you will use your trim mover to gently pop the cap off. This is the cap I am referring to.


IMG_5034_zpsypr1n7yc.jpg


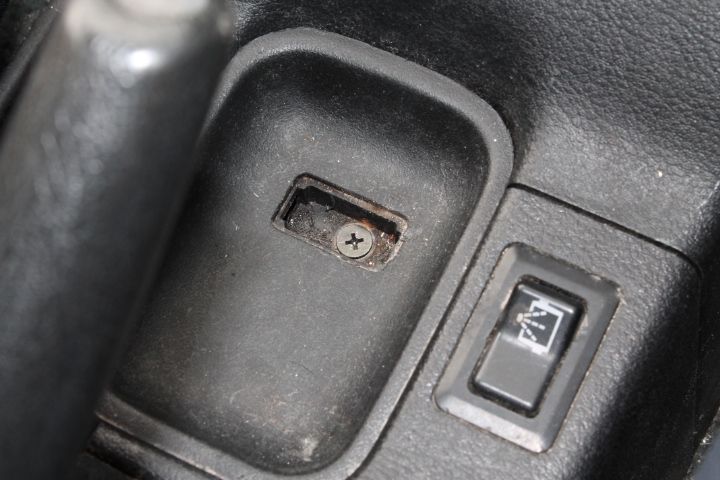
And just like that a wild screw appeared!


IMG_5035_zpszqednhdg.jpg


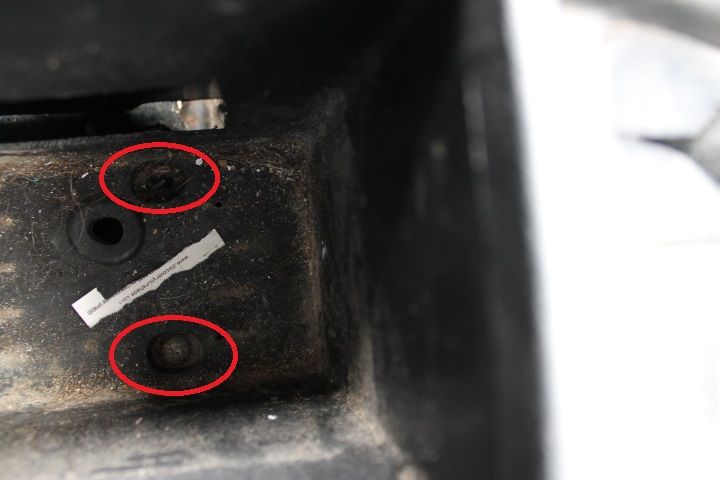
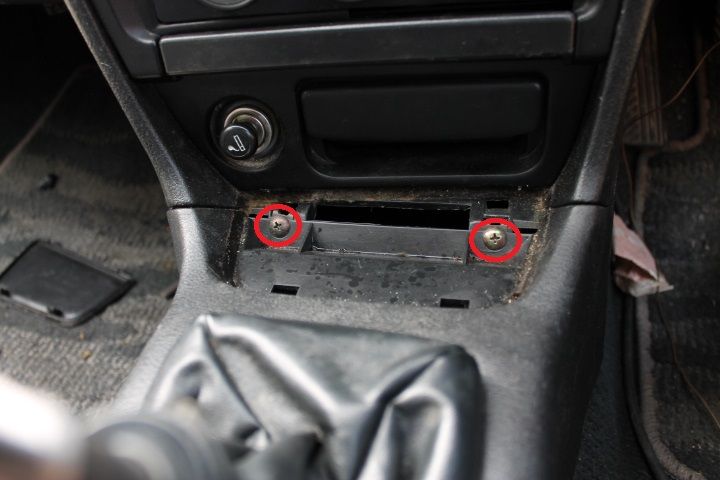
Next we will take out the screw in the center console, Unfortunately mine does not have anything inside like it should so I dont know if it just has a pull out inner casing or if it screw so you will need to figure that part out yourself but once that's out you should see these two screws that you will use longer screw driver to remove. 


IMG_5039_zpskmsfgcyv.jpg


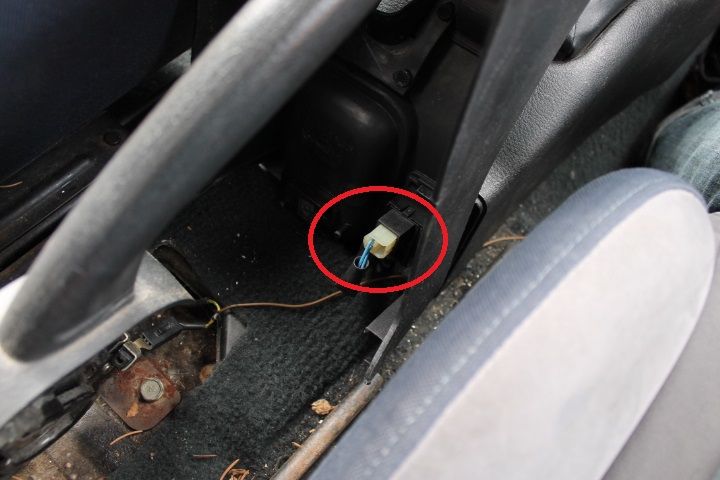
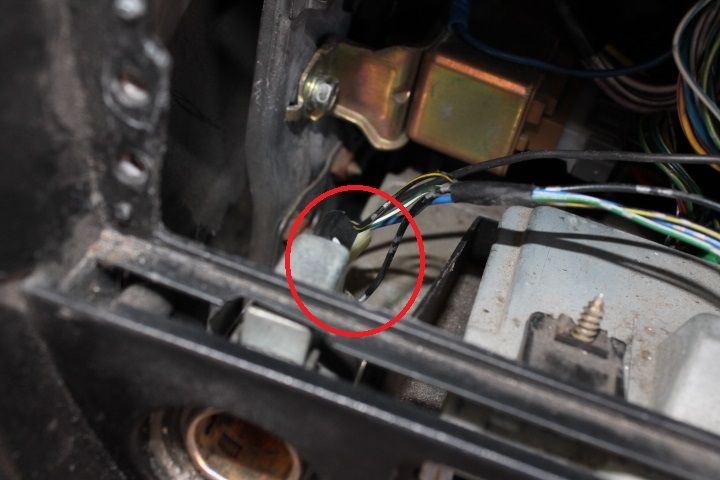
With these out its almost time to remove the console, just have to undo one electrical connector for your intercooler spray bar.


IMG_5040_zpszcgvwgsq.jpg


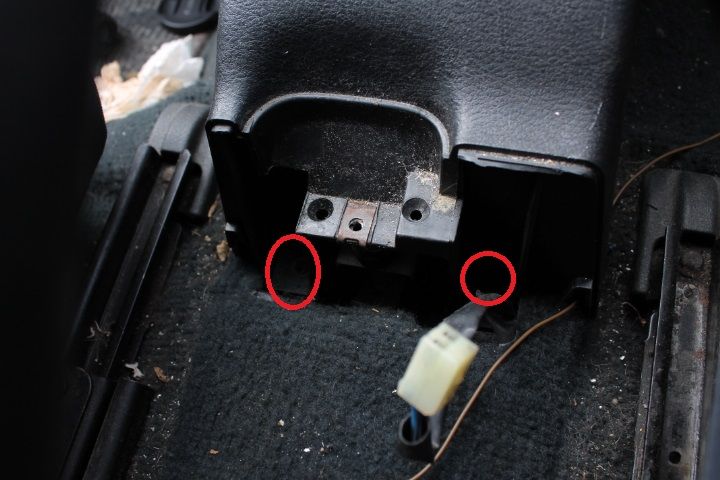
With the console now out of the way you will now be able to find 2 more screws holding down your shifter trim.


IMG_5041_zpskkogiufw.jpg


Now at the front of the shifter trim there is another cover that needs to be removed, again use the trim removal tool and gently pry it up.


 IMG_5042_zpsiifsygdf.jpg


With that out of the way it will now reveal 2 more hidden screws to remove.


IMG_5043_zps2kqnop21.jpg


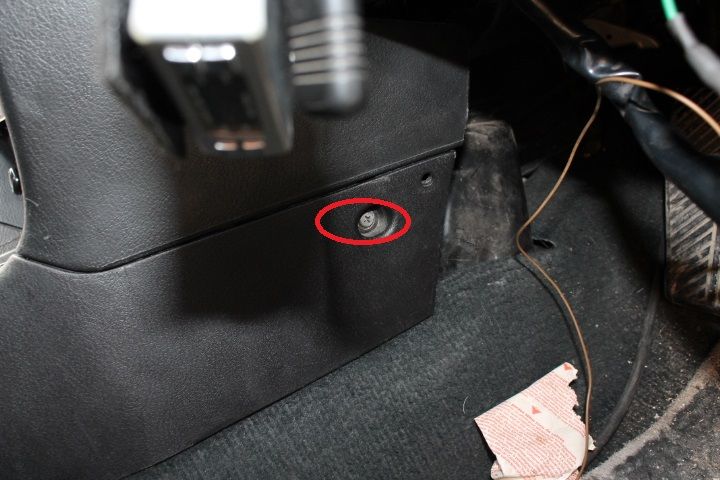
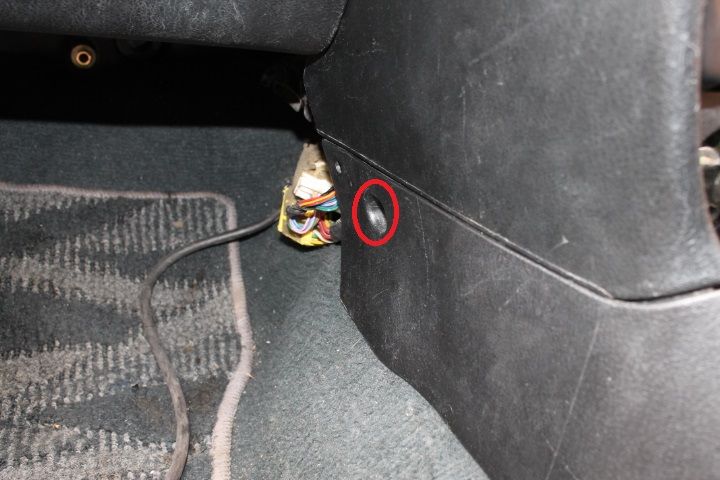
Now if we go the side of panel by your clutch pedal you will see another screw holding it in, there is another one in the same spot on the passenger side these both need to be removed.


IMG_5045_zpsszfqptjk.jpg


IMG_5046_zpsqulwruu2.jpg


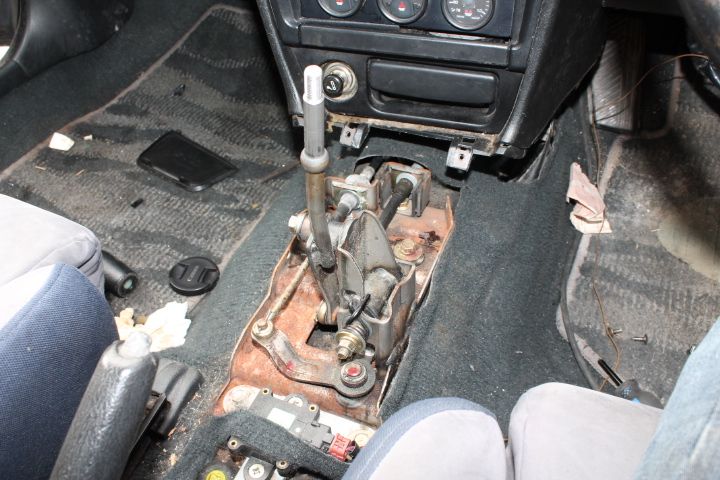
With that out of the way you should now be left with something like this.


IMG_5048_zps0hciyrm6.jpg


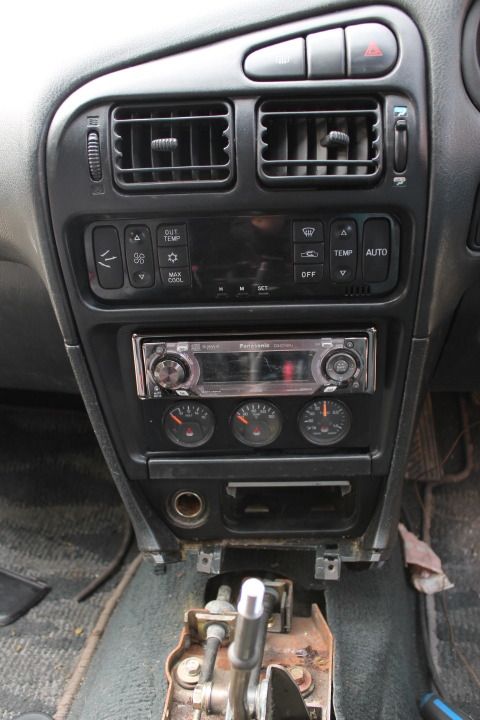
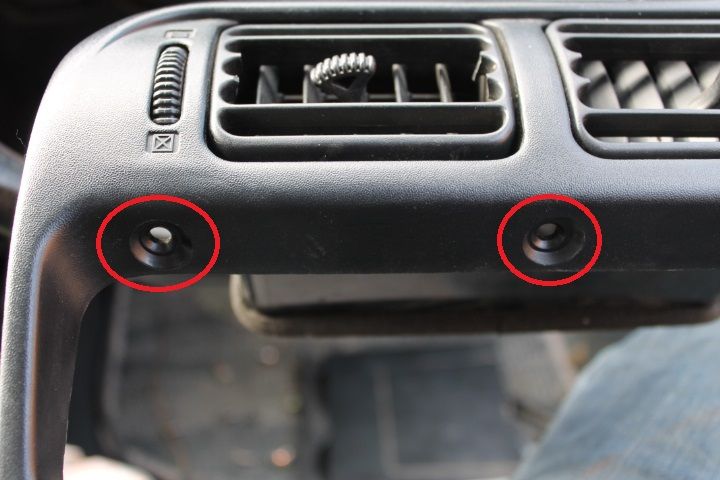
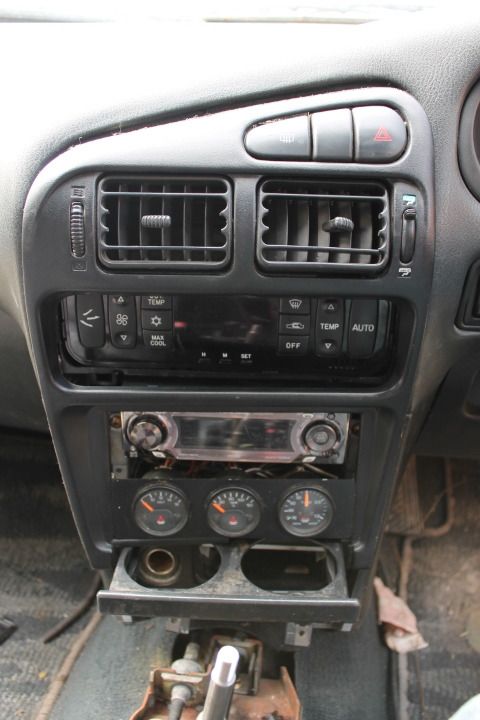
Next we will remove the stereo trim, to do this we will start by opening the cup holder, removing the ash tray and then remove two screws under the heater controls.


IMG_5049_zpsoebprrr4.jpg


IMG_5060_zpsm6x281xc.jpg


After that we will take out trim removal tool and starting at the top right hand side we will gently pry and pop it out working in a counter clockwise rotation. Reason for this is you have a greater chance for breaking the trim if done in the other direction as there is less plastic on the bottom and more holding force up top.


IMG_5050_zpsi8jlb0wa.jpg


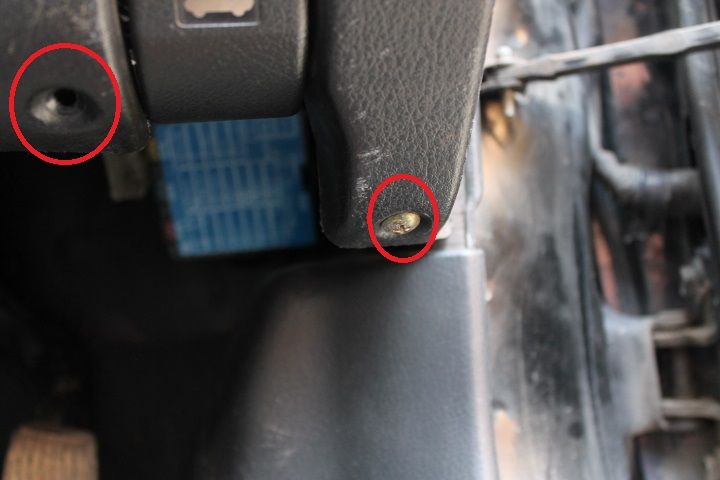
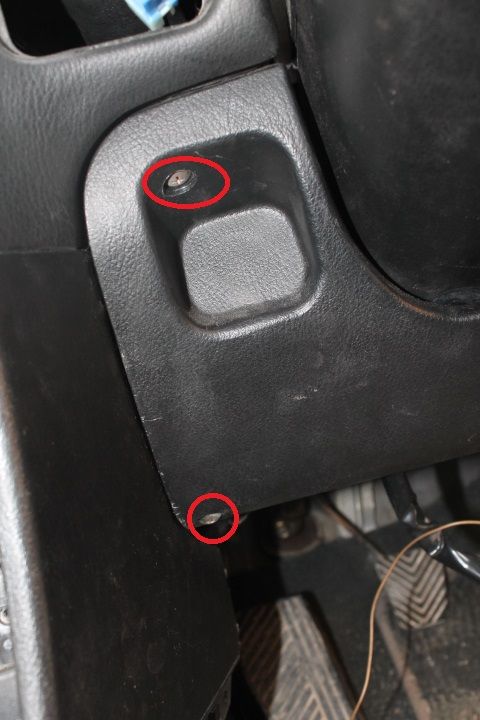
Ok now for a bit of a tricky part, you will need to disconnect the cable that opens your vents. To do this you will first need to remove the panel under your steering wheel. On the bottom right of the panel you will see two screws that need to be removed. 


IMG_5065_zpsczcjdkkh.jpg


On the right side of this panel you will see two more screws to be removed.


IMG_5066_zpssltivfca.jpg


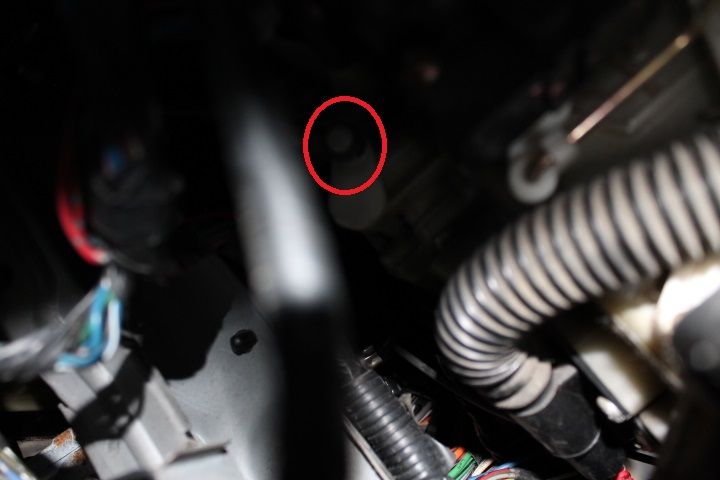
after these have been removed you should now be able to pop off the panel, now you can access the cable you need to remove. You will need to look under the dash towards your heater, just upwards and left of the clutch pedal. you should see a cable attached to the heater unit just simply pop it off.


IMG_5053_zpsktiog6or.jpg


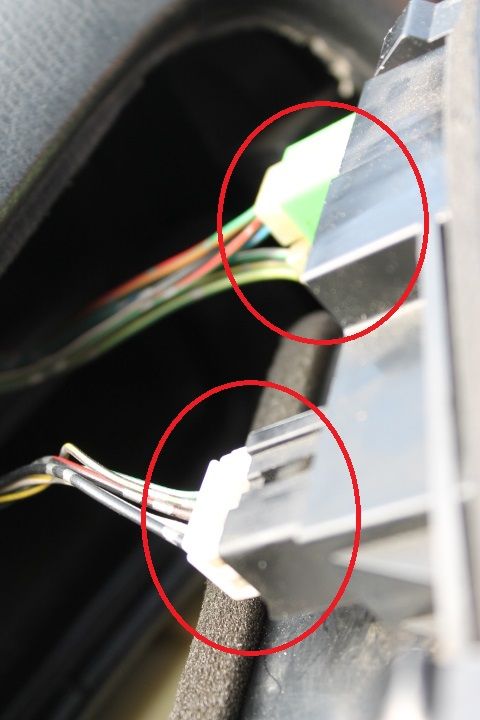
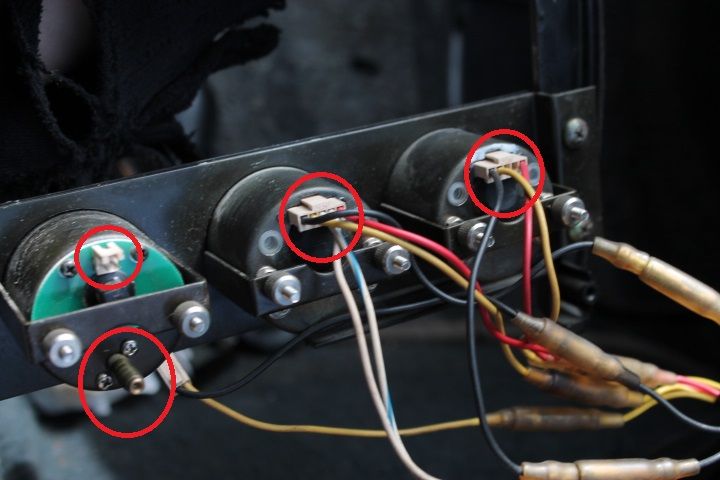
Now all that should be holding the trim up is a few wire connectors and a vac line, two up top and a few for the gauges. 


Top 2

IMG_5054_zps67ovdczq.jpg


Gauges and vac line

IMG_5055_zpsk9czsd9l.jpg


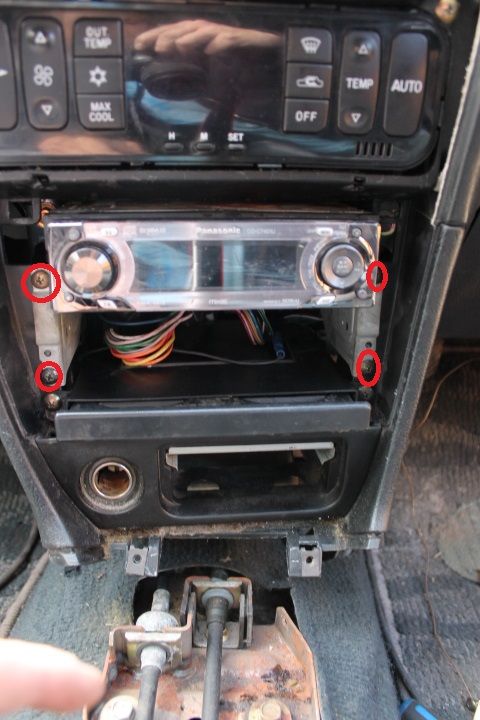
now the stereo trim should be completely free and pull away, next we will remove the stereo. This may be different for you if you have a double din but this should work for most single din decks. There will be four screws holding the deck in place.


IMG_5056_zpsvldcovtu.jpg


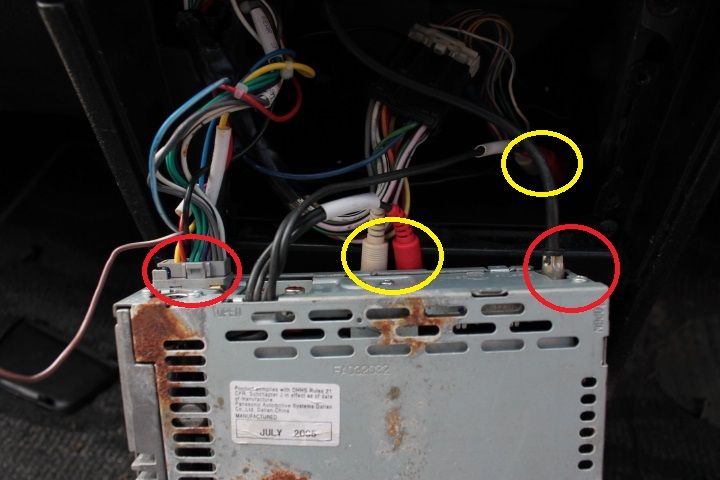
Now on the back side of the deck you will need to remove the antenna wire, wiring harness and if you have your other inputs ( marked in yellow ) remove those too.


IMG_5057_zpscdbdgroj.jpg


We will now remove the cup holder, all that's holding it in is two screws.


IMG_5058_zpsmpdhd31d.jpg


Next up is unplugging the Cigarette lighter just twist the small light out of its socket and then unplug the wires running to it.


IMG_5059_zpsxsw4t0c8.jpg


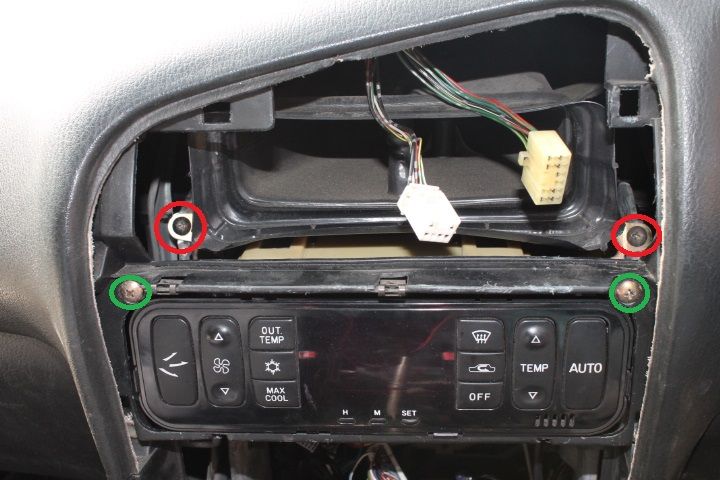
next we will undo the heater controls. Only two screws need to be removed the ones circled in green can stay attached as the heater control unit will come out with the dash no problem. Don't forget to remove the two electrical plugs behind the controls I couldnt get my camera behind it but you should be able to feel them. To do that just use your monkey arm powers and reach behind and unplug them.


IMG_5061_zpsj0pvf9fr.jpg


  • bj likes this

#2
dsm2evo

dsm2evo

    Advanced Member

  • Active Members
  • PipPipPip
  • 157 posts
  • Locationcanada

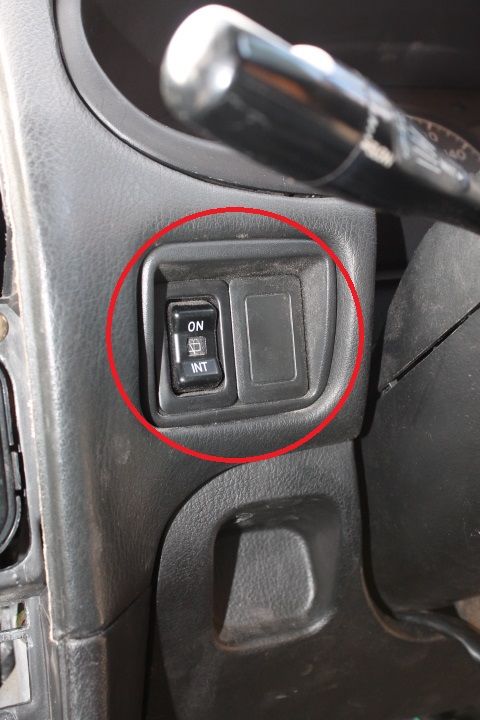
With that out of the way we can now take off a few electrical connectors but first we need to remove another trim piece. Get your trim removal tool and gently pop out your rear wiper button trim. 


IMG_5062_zpsjyuvtuyd.jpg


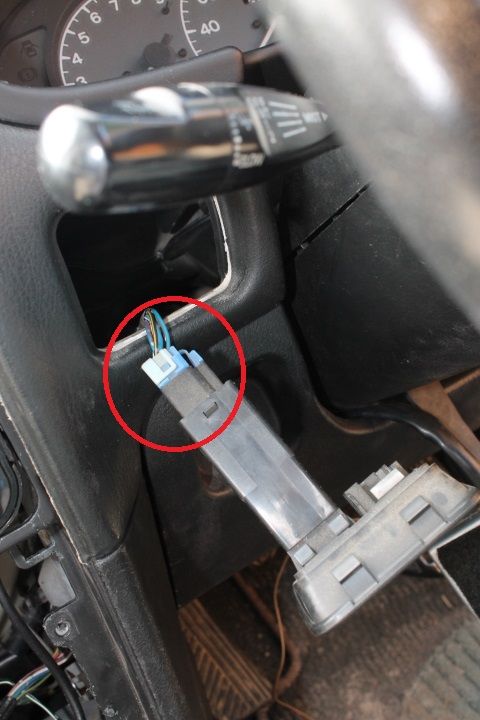
Then simply unhook the connector. 


IMG_5063_zpssw7qoq7z.jpg


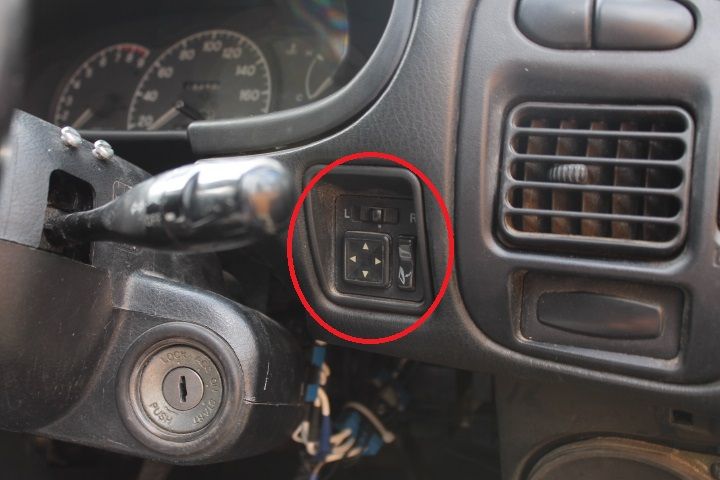
Now you will to unplug the folding mirror button, I couldn't get a good picture but just reach your hand behind the dash and unplug it.


IMG_5068_zps2ox2ubmn.jpg


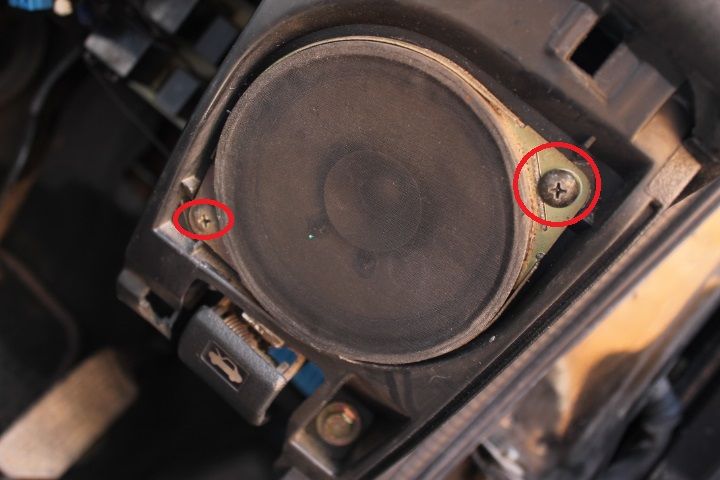
Now we will unscrew the speaker that's above your gas pedal leg, just two screws holding it in place and it will pop out and you will see a connector that needs to be removed. 


IMG_5069_zpspjknpzbu.jpg


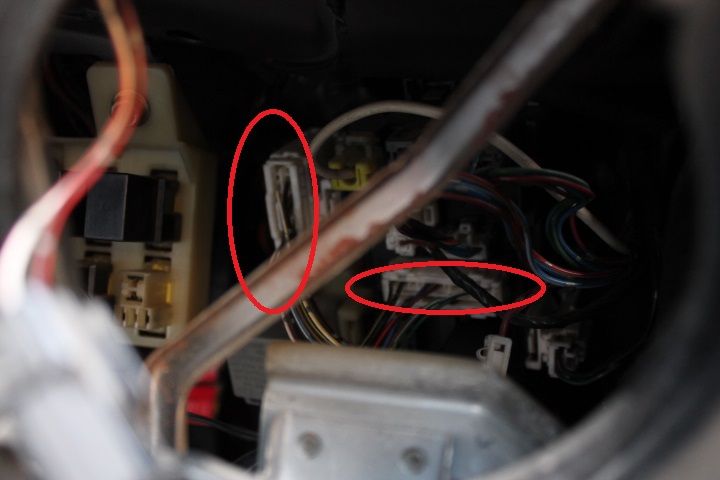
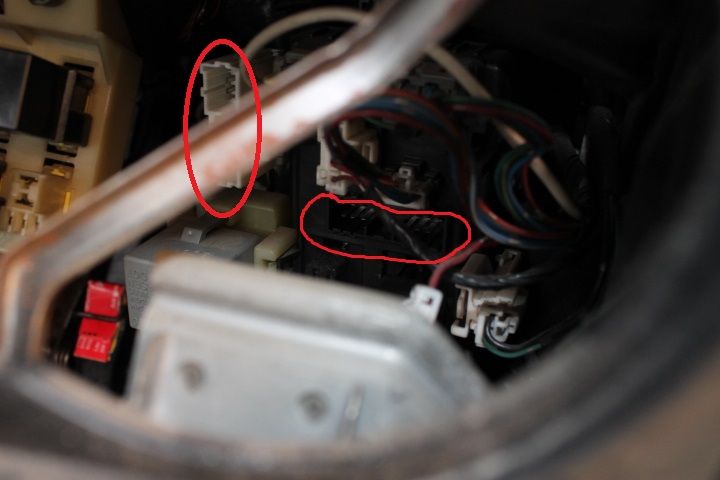
Now looking through the hole where the speaker used to be you should see a relay box and a bunch of electrical connectors, we only need to unhook 2. I took two pictures one showing the connectors attached and one with them unhooked so you could see the difference. 


IMG_5071_zps0zf570h6.jpg


IMG_5073_zpstlrzk2xe.jpg


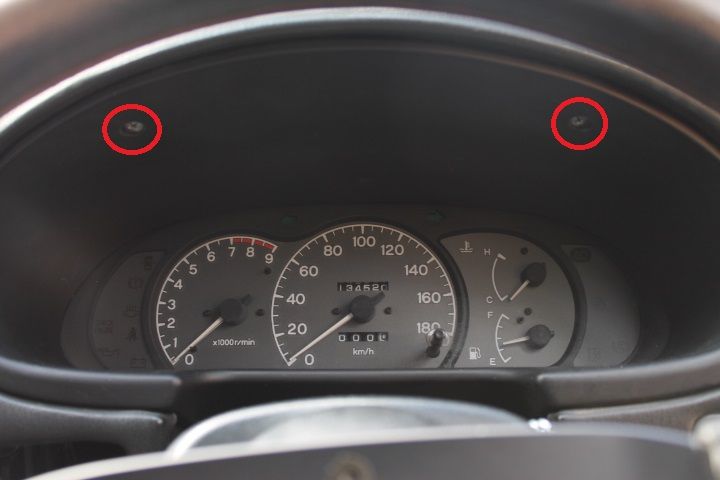
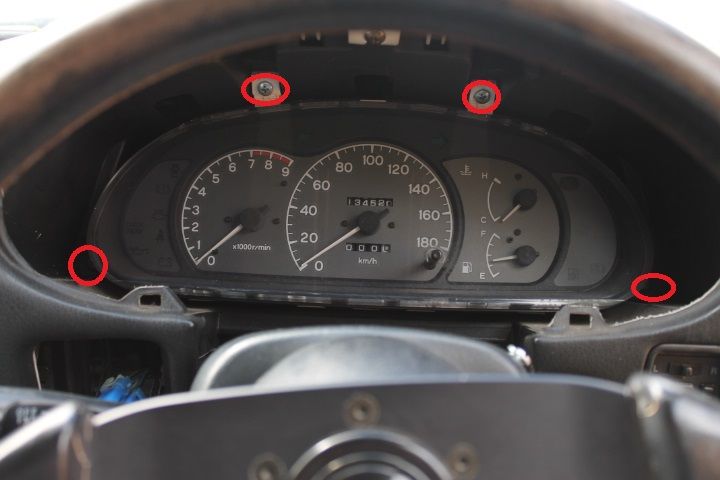
Next up is the gauge cluster, to do this you will need to remove a piece of trim being held in by two screws. Undo those  then drop your steering wheel and gently pull forward and it should pop out.


IMG_5074_zpsfdkhwwei.jpg


With that out of the way you will now see 4 screws holding in the cluster take those out and the cluster will be free. You will need to do a bit of maneuvering to get it out but be careful and take your time and you should be ok.


IMG_5075_zpsvsdiutsj.jpg


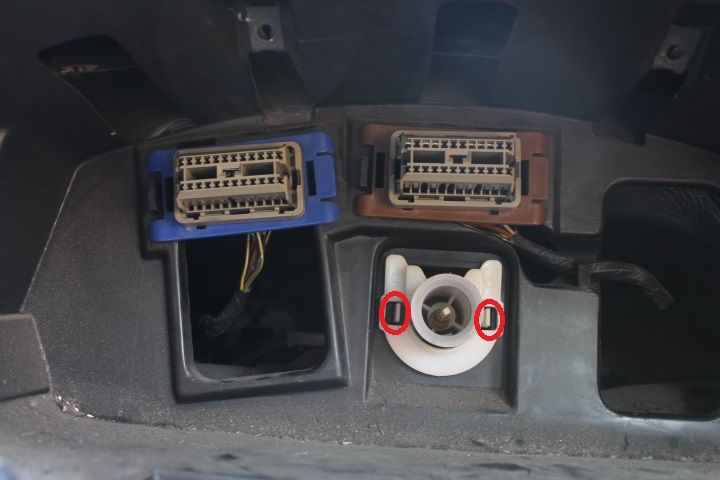
Now you will see two plugs and your speedo cable, you will want to push the two tabs holding the speedo cable towards each other and it will pop forward.


IMG_5076_zpspkkljiuv.jpg


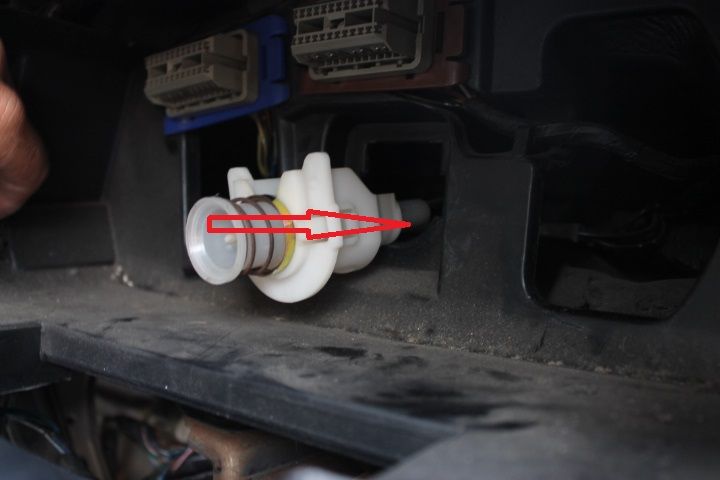
With that done now you will wand to grab these speedo cable in one hand and the piece with the tabs in the other and push it back it will release it from the cable if done properly. 


IMG_5077_zpslrgwkaqf.jpg


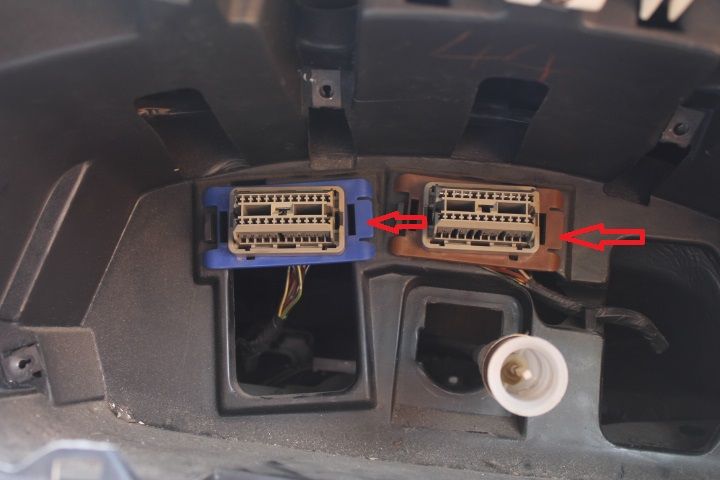
Now with the two electrical pieces all you need to do is push the little tab marked in red to the left and they should pop out of place.


IMG_5078_zpsxqoktp18.jpg


after that just push them behind the dash and you should get something like this.


IMG_5080_zpsr6pujukq.jpg


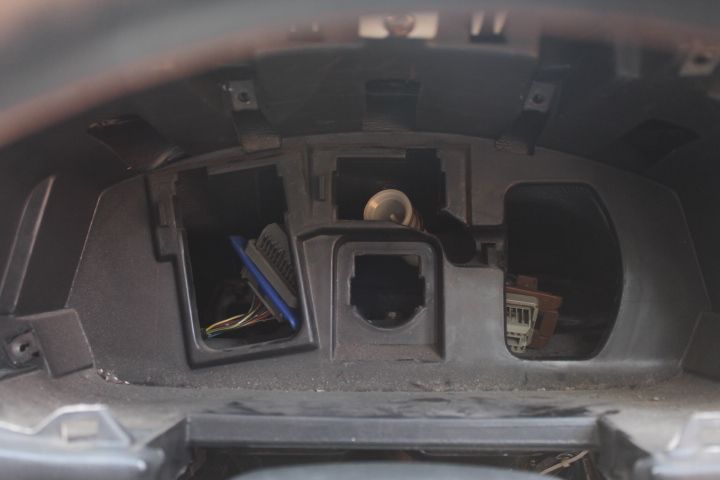
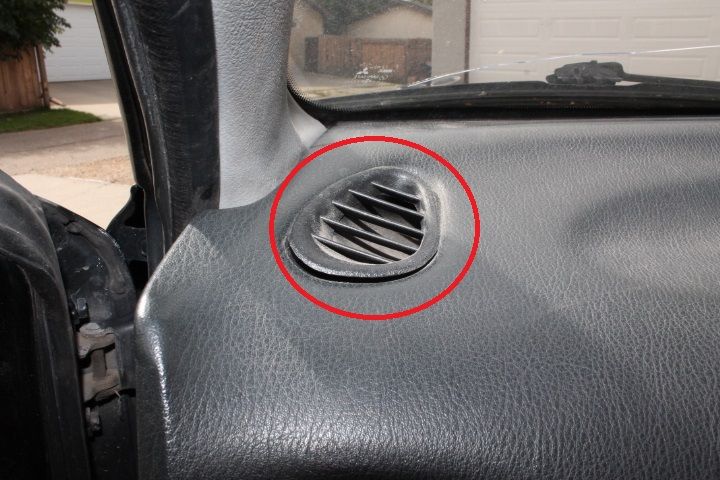
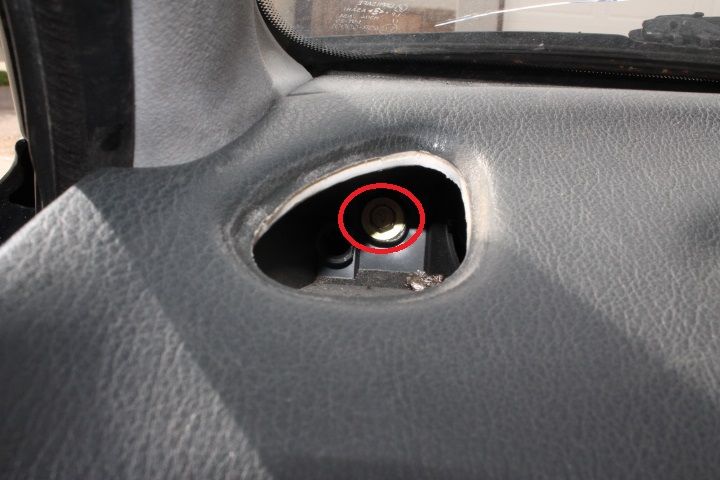
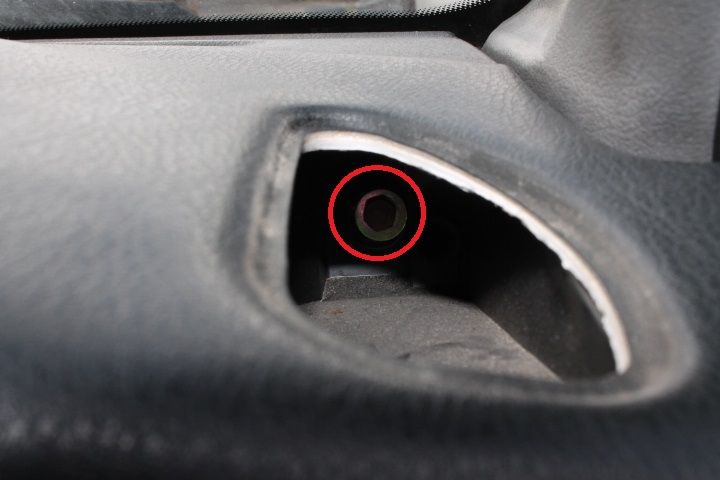
Now with your trim removal tool take off the vents by your A-pillar, pry gently and pull towards you they should pop out. There will be a 10mm bolt hiding behind it, Yup time to bust out that ratchet! Oh and the extensions haha.


IMG_5092_zpsl2umcelg.jpg


IMG_5093_zpsh3gttmyk.jpg


IMG_5082_zpsstn9ydm3.jpg


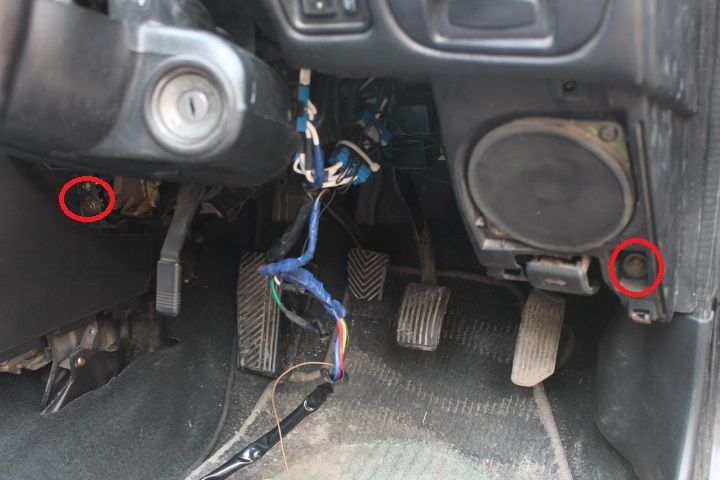
Next down by the speaker we removed is another 10mm bolt that needs to go, and another by your clutch pedal leg along with a screw right above it. 


IMG_5067_zpsq0s2i3u9.jpg


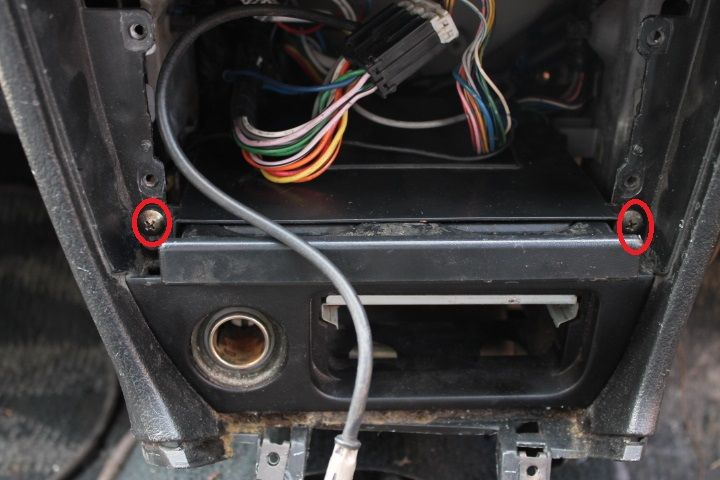
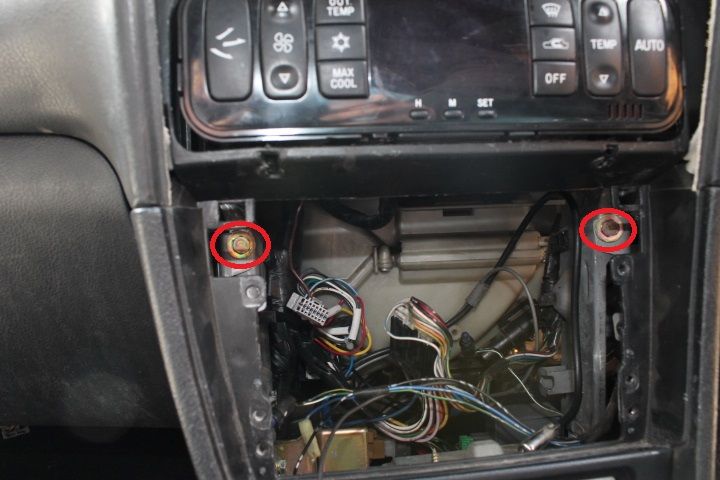
Next we will head back to the spot where your stereo used to be, there is two more 10mm bolts to come out.


IMG_5085_zpskapwn1yq.jpg


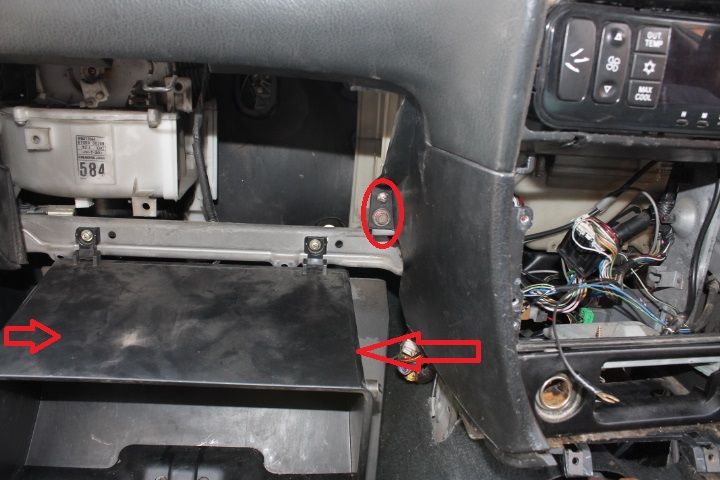
Now you will need to open your glove box, and push inwards on the two sides to release it and let it hang. This will uncover a hidden 10mm bolt and a screw that needs to be removed. 


IMG_5090_zps6yg1ojdt.jpg


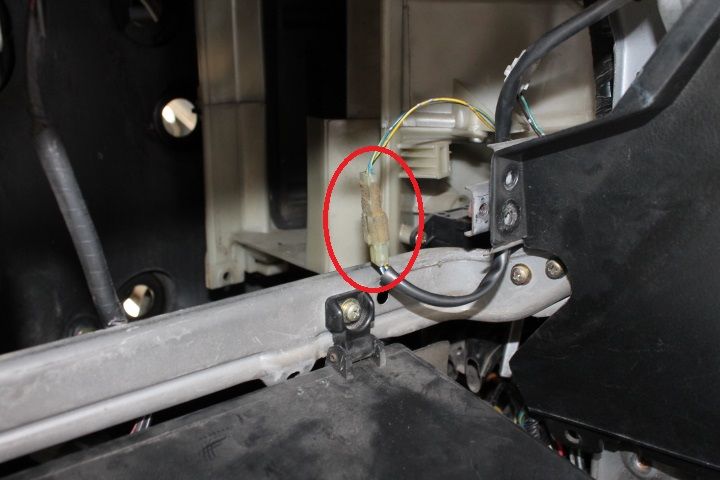
You will need to locate this wire behind the dash and unplug it, it was a real pain to unplug just a FYI.


IMG_5095_zpspvsecvls.jpg


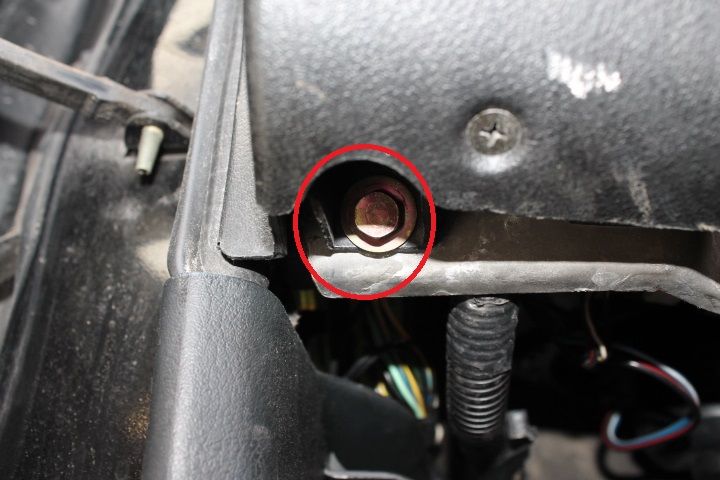
Above the passenger side kick pannel you will see another 10mm bolt that needs to be removed.


IMG_5097_zpsuiuftp9j.jpg


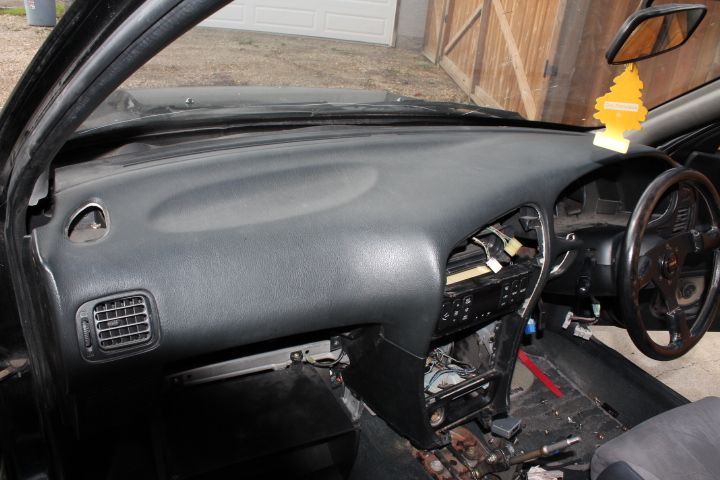
With that bolt out your dash should finally be free just give it a gentle tug towards the rear seats and it should come loose.


IMG_5098_zpsn0mopfha.jpg


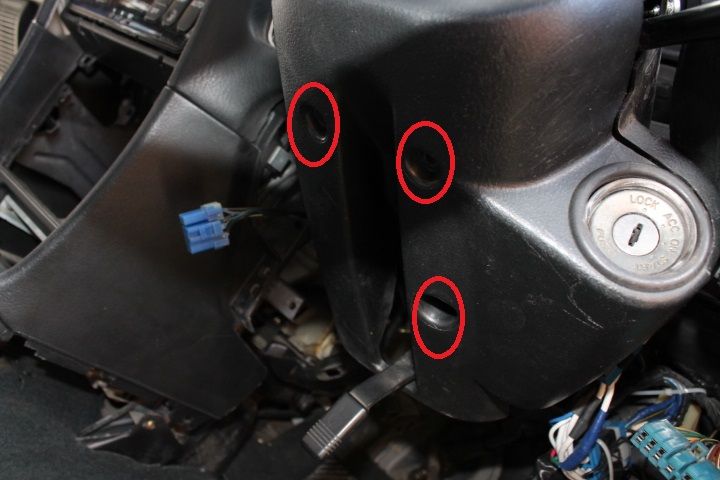
Head back to the drivers side and remove 3 screws from the underside of the steering wheel cover.


IMG_5099_zps90iogp4a.jpg


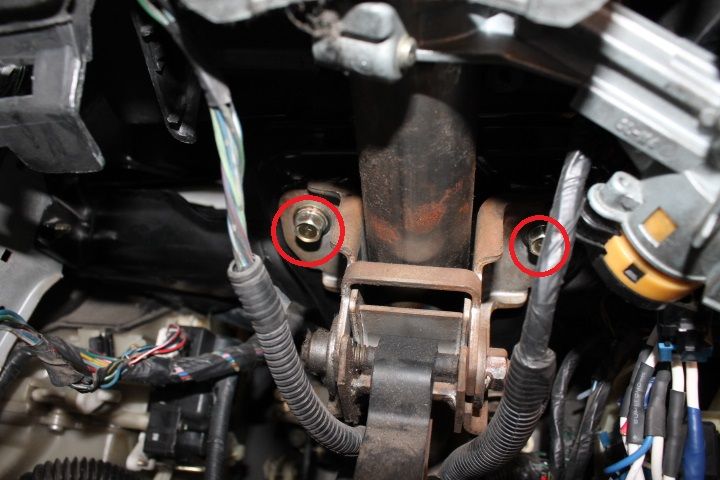
Underneath you will now see two bolts holding up the steering column these are 12mm remove these and it will give you a bit extra room to get the dash out. There are also two more further back but removing these is not recommended and thus optional by you.


IMG_5100_zpspotaywad.jpg


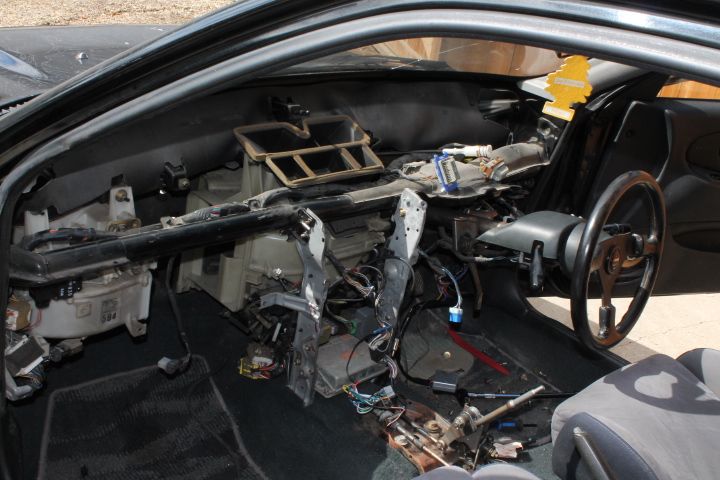
And now with a little patience, wiggling you should be looking like this!


IMG_5101_zps9xszayuj.jpg


I hope you guys liked the write up it took a full 12 hours to complete because I had to re install my dash and take it all back out to document it for you guys then re install it again xD. If I missed something or you have pics that I can add for the center console please let me know! 


#3
ENGINR

ENGINR

    Wannabe Racer

  • Active Members
  • PipPipPip
  • 5,061 posts
  • LocationMelbourne

Wow!  Really solid contribution mate.  Well done and very much appreciated.  This should be "sticky'd" in the tech section.


"I got an idea, an idea so smart my head would explode if I even began to know what I was talking about." - Peter Griffin

#4
dsm2evo

dsm2evo

    Advanced Member

  • Active Members
  • PipPipPip
  • 157 posts
  • Locationcanada

Haha thanks man It took all night to get it done but I hope this will help people in the future. 


#5
EV0300

EV0300

    Advanced Member

  • Active Members
  • PipPipPip
  • 1,502 posts
  • LocationVictoria, Geelong
Nice write up this will help alot of people in the future.

#6
Ian91

Ian91

    Advanced Member

  • Active Members
  • PipPipPip
  • 1,651 posts
  • LocationPomona, Sunshine Coast, QLD
Thanks, this will help when I get around to doing the climate control conversion

#7
Dave_GSR1.8

Dave_GSR1.8

    Advanced Member

  • Active Members
  • PipPipPip
  • 367 posts
  • LocationMelbourne

Excellent stuff! Really appreciate the effort you have gone to here. I have some heater control problems for which this will really be a huge help, so thanks again for all the detail here.


#8
dsm2evo

dsm2evo

    Advanced Member

  • Active Members
  • PipPipPip
  • 157 posts
  • Locationcanada
Your welcome everyone, I'm happy to know that this will help you guys out . I plan to make lots of write ups similar to this one as my build progresses.

#9
jake

jake

    Advanced Member

  • Donating Members
  • PipPipPip
  • 291 posts
  • LocationSunshine Coast

I pulled my dash out 5+ years ago and have avoided putting it back together because I have since fogotten how it goes back. Thankyou!


#10
dsm2evo

dsm2evo

    Advanced Member

  • Active Members
  • PipPipPip
  • 157 posts
  • Locationcanada

I pulled my dash out 5+ years ago and have avoided putting it back together because I have since fogotten how it goes back. Thankyou!


Haha your very welcome man! post pics if you get her back in and show off the awesome dash!


#11
SCS

SCS

    Advanced Member

  • Members
  • PipPipPip
  • 36 posts
  • LocationPerth
Great work. BUT. You've just scared me off tackling mine ! Seriously, thank you this will be a great resource.

#12
dsm2evo

dsm2evo

    Advanced Member

  • Active Members
  • PipPipPip
  • 157 posts
  • Locationcanada

Great work. BUT. You've just scared me off tackling mine ! Seriously, thank you this will be a great resource.

Honestly dont let scare you, took me a total of an hour at most to take it out. I have removed several dashes before and this is by far the easiest dash I have ever removed. 


#13
Willard

Willard

    Member

  • Active Members
  • PipPip
  • 28 posts
  • LocationBrisbane
Nice work, grab yourself a beer...I've always wondered how to get the dash out.
Now I know you just undo 675 screws and bolts and wiggle it out 😁
Evolution II GSR

#14
SIVART

SIVART

    CE9A-0000001

  • Sponsors
  • PipPipPip
  • 4,973 posts
  • LocationMelbourne

should be a sticky as its a good post with pics too 


#15
evopwr

evopwr

    [DIY]

  • Active Members
  • PipPipPip
  • 3,283 posts
  • LocationMelbourne
well done mate, comprehensive writeup!
---

4G63t, AWD, Widebody

Posted Image

---

#16
dsm2evo

dsm2evo

    Advanced Member

  • Active Members
  • PipPipPip
  • 157 posts
  • Locationcanada

Thanks everyone! I figured this was a nice bit of information a lot of people could use.


Also tagged with one or more of these keywords: Dash removal, Evo 1-3

1 user(s) are reading this topic

0 members, 1 guests, 0 anonymous users